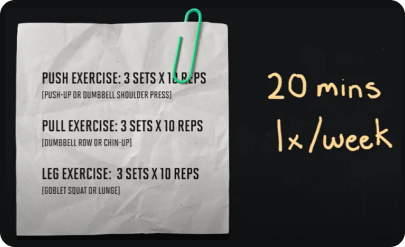
For many reasons and in many circumstances, despite our desire to regularly get to the gym, time doesn't seem to allow it. Then there are those who want to stay fit and healthy, but don’t enjoy the gym life enough to be sweating it out for two hour sessions. If this sounds like you, there’s good news.
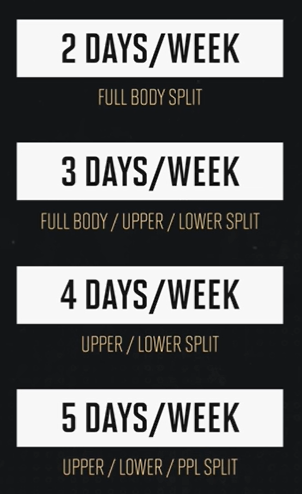
In this blog, I’m going to be taking you through some minimalistic workouts that’ll take you less than 45 minutes per session. Although it’s designed to be a two-day per week routine, if you want to train more than twice weekly, I’ll also explain how you can modify these two workouts into a 3-day per week, 4-day per week, or 5-day per week schedule.
Everything you need to know to set up your own minimalistic training split will be laid out in the next few pages. Throughout these workouts, you’ll be applying many of the fundamental minimalist training principles that I discussed in my YouTube video, which I’ll provide a link to at the end of the blog.
Let’s jump right in and begin our first session.
FULL BODY DAY 1
After two or three minutes of brisk walking on the treadmill and a few dynamic stretches of some arm swings and leg swings, you’ll kick things off with your first exercise.
Exercise 1 of 7
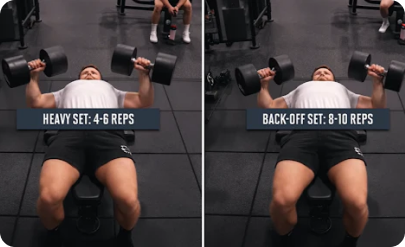
Flat Dumbbell Press: 1 Set x 4-6 + 1 Set x 8-10
The first set will be a heavy set for four-six reps and the second set will be a lighter back-off set for eight-ten reps. The idea here is to get your strength set in first, before doing your hypertrophy set.

In case you are wondering why we’re doing a dumbbell press rather than a barbell press on a minimalist routine, there are two reasons:
- Dumbbells are generally more time efficient in that you don’t have to chew up valuable time loading and unloading any plates.
- Dumbbells allow for a greater range of motion than the barbell.
This normally isn’t a big deal because we can compensate for the barbell’s minor limitation by also including a stretch-focused exercise, like a cable fly. However, on a minimalist routine, we’re trying to minimize the number of exercises we do. In this case, then, it makes more sense to choose a pressing exercise that also provides a large stretch on the pecs. A dumbbell press or a dip would probably be our best option.
From a technique standpoint, I recommend lowering the dumbbells down with a slight elbow tuck at around 30 to 45 degrees when viewed from the top. Then, as I press, I’ll flare my elbows out. If you feel any shoulder discomfort when you flare, it’s fine to just keep your elbows tucked the entire time.
EXERCISE 2 OF 7
DUMBBELL ROMANIAN DEADLIFT: 2 SETS x 8-10 REPS
As in the first exercise, once again, you’ll be sticking with the dumbbells mainly because they tend to be more time efficient. Note how the biomechanics of this exercise will be the same whether you use dumbbells or a barbell.
The main thing to keep in mind with the RDL is to simply push your butt back as you allow the weight to drop straight down, under control. Don’t think about lowering the weight to touch the floor. Simply set your hips back and let the dumbbells naturally lower in a straight line, reversing the motion once you feel a big stretch in your hamstring, without allowing your lower back to round.

I like to maintain a nice smooth cadence on these where I don’t fully lock out at the top. It helps me keep tension on and really feel my hamstrings. However, if you want to activate the glutes a bit more, you could lock the hips at the top and squeeze your glutes together.
If you find that your grip strength limits the amount of tension your hamstrings receive, I’d strongly recommend using straps for this exercise.
EXERCISE 3 OF 7
2-GRIP LAT PULLDOWN: 2 SETS x 10-12 REPS
For the first set of exercise three, you’ll be doing an overhand middle grip to target the mid-back and the lats. Then, on the second set, take an underhand close grip to target the biceps a bit more and to hit the lats from a slightly different angle.

After the second set, to get a little more bicep work, you can strip the weight back and do some overhead curls. This way we’ll make sure the high threshold bicep fibers experience a high level of tension as well.
EXERCISE 4 OF 7
DUMBBELL STEP UP: 1 SET x 8-10 REPS (PER LEG)
This will be your main quad and glute focus movement for the day.
One thing to remember about minimalistic training is that because you’re often only doing one single set for some exercises, it’s very important that you execute that set as perfectly as possible.
To minimize cheating during the step up, force your front leg to carry all the load and use your back leg simply for balance. I prefer to work each leg one at a time. This ensures I’m not losing tension between reps.
Most people stop well shy of failure on step-ups and lunges, likely because they’re using dumbbells that are too light. To get to failure, or at least within one rep of failure, you’ll probably need heavier weights than you’d normally use. Again, using straps is smart since they’ll prevent your grip strength from being a limiting factor.
EXERCISE 5 OF 7
OVERHEAD CABLE TRICEP EXTENSION: 1 SET x 12-15 REPS
Since you’ve already hit your triceps in a more neutral shoulder position with the flat dumbbell press, it would be a bit redundant to also hit them with a regular press-down. For this reason, let’s go with the overhead tricep extension in exercise five.
It’s worth noting that a new 2022 study from Mayo and Colleagues found that overhead tricep extensions resulted in about 40 percent more hypertrophy compared to regular press-downs, even when volume was matched.

Online, there’s been quite a lot of noise about this study. Some people claim that the results are most likely a fluke. However, according to the MASS Research Review, it was a very well-designed study and there are at least three plausible explanations for why overhead extensions led to substantially more muscle growth than press-downs.
While I wouldn’t put too much talk into a single study like this, if you’re limited on time and can only fit in one tricep isolation movement, I would favor an overhead tricep extension more than press-downs.
For proper technique, position the cable just behind your head, lock your elbow in place, squeeze your triceps to move the weight, and then, lower the weight back down under control, while trying to feel a nice big stretch at the bottom.

After reaching failure once, drop the weight back by about 30-40 percent and then take the triceps to failure once again.
EXERCISE 6 OF 7
ACHINE LATERAL RAISE: 1 SET x 12-15 REPS
For this exercise, I use an Atlantis standing lateral raise machine at my gym, mostly because I find I can get a much larger range of motion, while maintaining consistent tension on my side delts. However, if you don’t have this machine, you can use a seated machine option, a cable machine, or even dumbbells.
As long as you’re taking the muscle to failure with good form, the fibers will be maximally recruited, regardless of machine choice. Also, by strapping in here, you can use only your side delts to sweep the weight out, as opposed to relying on your grip and more specifically, your thumb, to support the weight.
I use a larger-than-usual ROM on these, but if that ROM isn’t comfortable for you, you can just stop at 90 degrees (parallel to the floor). As long as you’re taking the set to failure, the total activation level will be very similar.
After reaching failure, drop the weight by 30 to 40 percent and go to failure to really finish the fibers off. By doing this, you’ll be getting a little extra volume done, without killing too much time doing a whole other set.
EXERCISE 7 OF 7
LEG PRESS TOE-PRESS: 1 SET x 12-15 REPS
As you can see in the photos below, performing calf raises on a leg press machine is the exact same basic movement pattern as doing them on a standing calf raise. Note how on both exercises, your leg is straight, not bent.

Of course, when doing calf raises on a seated leg press machine, your upper body doesn’t have to bear any of the load. This may allow you to get a better mind-muscle connection with your calves.
Again, after reaching failure, I’ll drop the weight back by 30 to 40 percent and go to failure again. One thing to keep in mind with the calves is to make sure you don’t start bouncing on the drop-set reps. A lot of people have a tendency to let loose once fatigue starts setting in. Keep in mind that you’ll get the most of the set if you keep your form locked in.
Remember, each and every rep should have a nice one-second or so pause at the bottom and a full squeeze at the top.
FULL BODY DAY 2
EXERCISE 1 OF 6
HACK SQUAT: 1 SET x 4-6 + 1 SET x 8-10 REPS
We’re selecting the hack squat over a barbell back squat here primarily because we’re trying to be time-efficient. On a minimalist routine, you can often get away with less warm-up sets on machines than you can on free-weight compound exercises, thereby you get to bank a lot of time with this choice of exercise.

With barbell back squats, it’ll sometimes take me half an hour just to get all my warm-up sets done. Whereas with the hack squat, I’ll just hit two or maybe three quick warm-up sets and then I’m doing my working sets within five to ten minutes.
For the first heavy top set, choose a weight that’ll have you about one rep shy of failure. In other words, aim for an RPE of 9 for 4-6 reps. When I do this, I just focus on moving the weight. I’m thinking about driving through my heels while maintaining consistent pressure against the shoulder pads.
After the first heavy set, rest for about three minutes, and then for the back-off set, drop the weight back, this time focusing a little more on controlling the negative and feeling your quads working. Since this is more of the hypertrophy set, focus more on the mind-muscle connection, rather than just moving the weight.
On both sets, be sure to get to full depth and purposefully allow your knee to come forward past my toes, which is perfectly safe. (At the end of the blog, I’ve posted the link to a video on this.)
Next, you’re doing an Antagonistic Superset for the chest and back.

I’m a big fan of this training efficiency where one muscle will be working while the other is resting.
In this case, you’ll be doing two sets of a high-incline Smith machine press to target the pecs, shoulders, and triceps. You’ll super-set that with a T-bar row to hit the mid-traps, lats, rear delts, and to some extent, the biceps.

With the incline press, set the bench angle a bit higher than usual (I prefer around 45 to 60 degrees). This higher bench angle gets the delts more involved than a horizontal press. But rather than having to do both a vertical and horizontal press, to save on time, the high-incline press is basically meeting in the middle. You’ll do a good job of hitting the pecs and the shoulders with a single movement.
If you take a slightly closer grip when executing the exercise, you can take the triceps through a greater range of motion and this will shift some of the emphasis to the upper pecs as well, which is a weak point for most people.
Proceed to super-set this with 10-12 reps on the t-bar row. My gym’s t-bar row machine is right next to the Smith machine so I can superset these two easily. However, if your gym has these two machines further apart, instead of t-bar rows, you can just flip around on the bench, grab some dumbbells, and do some chest-supported incline dumbbell rows for the same sets and reps.
When doing t-bar rows, I’ll usually do one set with a wider grip and one set with a closer grip, just to target the back from slightly different angles. I should also point out that even though we are super-setting, it’s ok to rest for about 30 seconds to a minute in between the two exercises, if needed. Just because you are super-setting and you’re going back and forth, doesn’t mean you need to go straight to the other exercise. Getting a little rest in between to catch your breath is often a good idea.
In practice, the super-setting looks something more like the layout below.This still saves on time, but allows you to recuperate more in between supersets.
EXERCISE 4 OF 6
SEATED LEG CURL: 1 SET x 10-12 REPS (+ DROPSET)
Relevant to exercise four, a 2020 study showed greater hamstring growth with seated leg curls over lying leg curls across a 12-week study.

Considering this, if given the option to do only one, I almost always favor seated leg curls. The difference noted in the study is likely related to the higher degree of stretch you get on the hamstrings with the seated variation.
You can accentuate this effect by leaning forward over the machine throughout the set. Since you’re only doing one set here, take it all the way to failure, then drop the weight back by 30 to 40 percent, and go to failure again.
EXERCISE 5 OF 6
EZ-BAR BICEP CURL: 1 SET x 12-15 REPS (+ MYOREPS)
Considering that, once again, you only have one all-out set to failure here in exercise five, be sure to execute that set as perfectly as possible. Focus on curling the weight out AND up (not just up) and drive through your pinky to cue for supination as you curl.
To really engage the bicep, think about squeezing your biceps to move the weight, while keeping a looser grip on the bar so that your forearms don’t take over.
After hitting failure with good technique, rather than a drop set, this time you’ll do some Myo-Reps to enhance the set even further.
To execute, keep the weight the same, and instead of dropping the weight back, you’ll simply rest for 3-4 seconds and then do another four reps. Then, you’ll rest for another 3-4 seconds and do another four reps. Keep repeating this cycle until you can no longer get four reps. At that point, the set is done.
The good thing about Myo-Reps is that they allow you to get in a lot more high-tension reps in a short period of time.
Remember, it isn’t until near the very end of the set that the reps become maximally hypertrophic. Consequently, by doing these Myo-Reps mini sets, where the muscle is already very close to failure, you’re essentially cutting out any of those early low-tension reps and jumping straight to the more effective stuff.
EXERCISE 6 OF 6
CABLE CRUNCH: 1 SET x 12-15 REPS (+ DOUBLE DROPSET)
I like to do the kneeling with the rope locked in over my head. Then, I’ll crunch down hard on my abs and allow my entire back to round including my lower back. I suggest that you give this technique a try also.

After reaching failure once, drop the weight back by 30 percent and then go to failure again. Then, to really finish things off, do one more drop set. This time, strip it back another 20-30 percent and then go to failure one final time.
If you guys were wondering how you could adapt this to a 3, 4, or 5 days per week program, this is how I would do it.
Keep most of the exercise sets and reps the same, but simply modify how you’d split up your volume throughout the week.
If you want to train three days a week, do the same full-body workout number one, and then split the second full-body day up into an upper-body day and a lower-body day. You could also add a little more volume to the upper-lower days by either adding an extra set for some of these exercises, or you could add a few extra exercises for your individual weak points on those days.

If you want to train 4 days a week, simply split up both full-body workouts into two separate upper-lower days. That is, you go upper- lower- rest, upper- lower- rest. Again, you can add some volume to these workouts if you find them to be a bit too short.

If you want to train five days a week, you could do the same basic thing, but this time with an upper-lower / push-pull- leg split done five days per week.

Of course, if you want to have all this work done for you, simply check out my new 12-week Essentials Program over on jeffnippard.com.

It’s made up of workouts very similar to the ones in this blog and, as mentioned, is designed to get you in and out of the gym in under 45 minutes. The program comes in a 2-day per week, 3-day per week, 4-day per week, and 5-day per week version.
A summed-up video of this blog is also available on my YouTube channel.
That’s it for this one, guys. Thank you so much! I’ll see you guys all here for the next blog.
References:
Overhead Triceps Extension Research:
https://pubmed.ncbi.nlm.nih.gov/35819335/
https://www.massmember.com/products/mass-subscription/categories/2151295402/posts/2161731393
Hamstring Curl Study:
https://pubmed.ncbi.nlm.nih.gov/33009197/
Knees Over Toes video:
https://www.youtube.com/watch?v=dCHLUtf--pg&t=0s
Training Minimalism Explained Video: